Blog #29 Experimentation in Photography
Blog #29 Experimentation in Photography
From the moment that we come into the world, we experiment. Babies cry until they reach the right volume or duration that results in successful achievement of their parents’ attention, food, or to get a new nappy. Once we can walk and talk the experiments become more elaborate and of a physical nature such as making attempts to escape the room with a younger brother’s new shiny toy, unnoticed. The young child may conduct an experiment to avoid eating broccoli by surreptitiously feeding it to the dog waiting under the dinner table like the driver in a getaway car waits for the bank robber. Did mommy see? No? Ok, proceed with replication procedure tomorrow. During school age, we test our friends, relationships, and especially our teachers. We test our curfew times throughout adolescence and the limits of our selves, co-workers, and bosses once we enter the workplace. Creativity, problem solving, and experimentation, seem to be human nature. “The creative adult is the child who has survived” said the brilliant and accomplished fantasy novelist and author Ursula K. Le Guin. Artists, too, experiment to find their creative voice.
As photographers, the world is our laboratory. The experimental possibilities are endless. Whether you purchased your first DSLR last week or you are a seasoned veteran who has been shooting since before the days of digital, experimentation is an essential part of the growth process for any artist who draws with light. Many of the masters can be seen as going through stages or changing their style over the years or decades. Irving Penn was a wonderful and innovative photographer for Vogue Magazine for decades who shot travel, portrait, fashion, and even abstract genres within photography in his later years. Penn can be clearly seen, like other masters before and after him, to have continuously evolved and developed their unique styles. There are many ways in which the photographer can experiment.
Experiments can come in different sizes such as large or small. Large experiments can be conducted over longer periods of time. Large experiments might include tests involving gear. This is the obvious and (usually) first choice for many photographers as they enter into the foray. Do I shoot with my smartphone, film, mirrorless digital camera, or all of the above? Most film photographers will at least try various films and/or film sizes (i.e. 35mm, medium format, 4x5, etc…). Do I shoot in black and white, or in color? Trying out other genres may consist of a various sequence of experiments that a photographer may work through over time such as moving from portrait, to landscape, to macro, for example. This would constitute a large experiment one that could literally last a lifetime (and rightfully so). Abstract photography is something that most of us dabble in to explore the possibilities. After all, there really is no such thing as a bad picture suggested Susan Sontag in her epic text On Photography in 1973.
Small experiments can be conducted to hone one’s skills or style such as playing with sensitivity settings, shutter speed settings, lighting set ups, and so on. Lens selection and the learning of the various applications of the many focal lengths is a common area that photographers will experiment with sometimes from day to day or even frame to frame. I continue to oscillate between the use of my two favourite focal lengths 50mm & 35mm, although even that is changing as I have recently become enamoured with my 85mm f/1.2. Ooo, the sharpness, Ahh the Bokeh, give me more of that, baby!
Experimentation has various functions for the artist photographer. Learning to use various types of equipment such as camera bodies and lenses, developing ones style through exploring genre, and overcoming the photographers equivalent of writer’s block are a few of these functions. Writer’s block for the photographer can be aptly named brain lock up that is similar to unintentional mirror lock up with an SLR. The thing just stops.
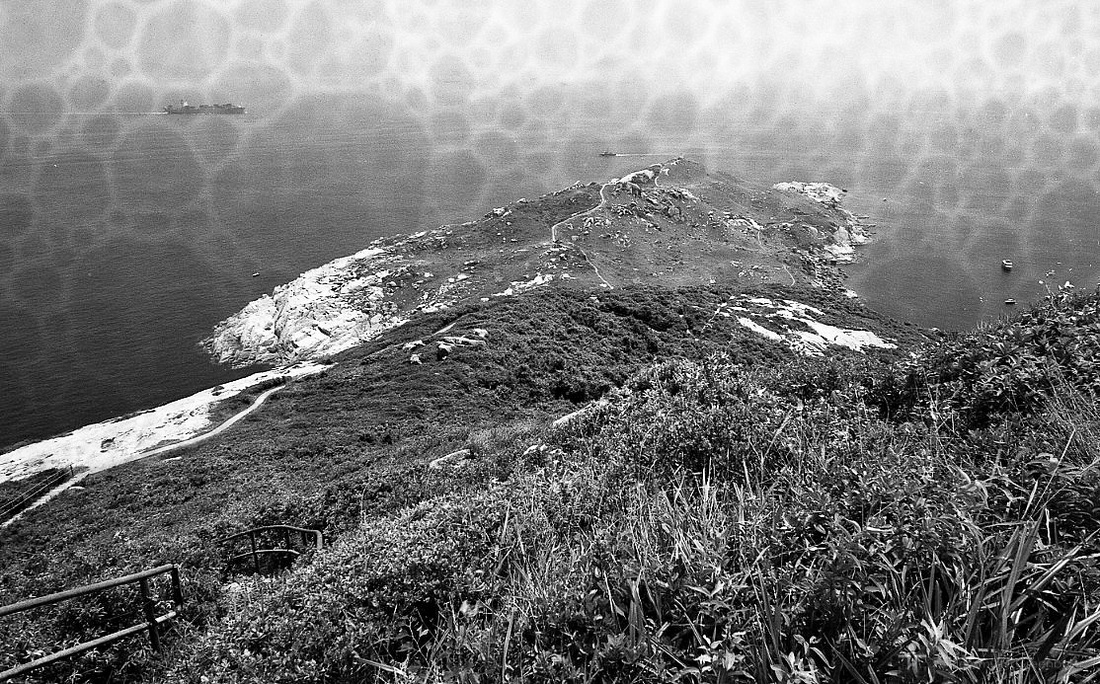
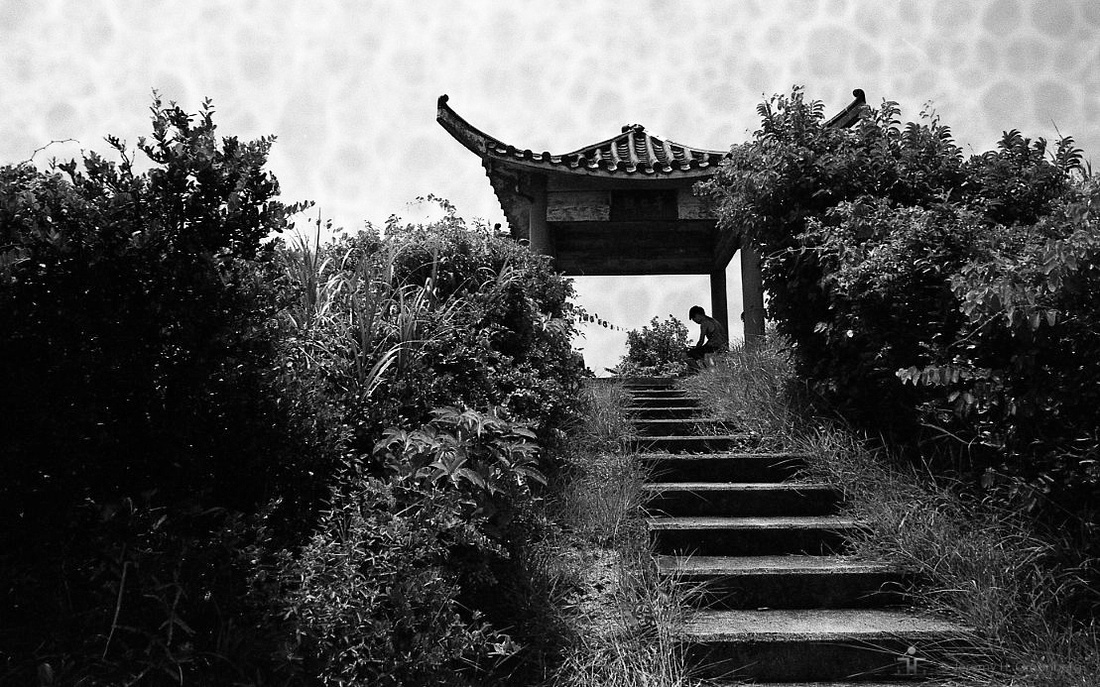
I regularly switch between digital and film, black and white and color, and various lens options to find that just right fit given the subject and conditions that I’m shooting in. I will then stick to these formulas and rarely alter them once I find a winning combination. Although I’ve been favouring 35mm film mostly for personal assignments there are so many planets to explore even within the 35mm film medium. Different film brands, sensitivity ratings, and exotic film types such as infrared (IR) are just a few. Recently, on a day hike on one of Hong Kong’s outer islands Po Toi bringing nothing more than my trusty Nikon FE SLR, 24mm 2.8 prime lens, 36 exposures of Rollei 35mm black and white infrared 400 speed film and a Hoya 25A red filter I set out to see what I might come back with. Instead of shooting black and white or colour, I really wanted to try some IR landscape photography just to keep things interesting. Next came the trip to the darkroom and the development process began. All seemed to go well in general until I saw the results. What the hell is that? Bubble stains? This was very unusual, indeed. I have developed dozens of films using the same chemicals and procedure that I used on this film, however, the results came out different. I suspect that the Photo Flo agent used in my final rinse reacted with a particular compound in the emulsion used in the IR film. I will try to go back and re-wash the film or give it a dip in a stop bath again as was suggested by a friend and local distributor of all-things film photography related. I was of course a bit disappointed about the results of this little experiment but alas! The famous Thomas Edison had it right when he concluded “I have not failed. I’ve just found 10,000 ways that won’t work”.
In conclusion, experimentation is inherent in human nature, and the same is true for photography. It begs the question, does photography bring out the creative, artistic tendencies in the photographer in each of us lying in wait just below the surface? Alternatively, are generally inquisitive or curious people determined to be photographers so that we can continue our insatiable appetite for experimentation through photography? Perhaps the real question is what will be your next experiment?
The light is always right.
jhg

Blog #28 Gear for Travelling, Revisited
Blog #28 Gear for Travelling, Revisited.
There’s an old Jewish express that says man plans and God laughs. The Blog post #26 was before my 10 day trip to the south of France where I discussed my decisions about the gear that I planned to bring along for the shoot http://jeremyhgreenberg.zenfolio.com/blog/2016/6/blog-26-gear-for-travelling-light-is-right. I did, in fact, bring all of the gear that I planned to bring. It all fit snuggly in the backpack so nicely. As luck would have it, things didn’t work out as planned but, thankfully, I managed to avoid major drama. The first issue was regarding the film camera. I learned quickly that it was a bit to optimistic to think that I could travel with a 30 plus year old film camera and have no issues. The Minolta rangefinder (RF) CLE body I brought was one of two that I have and previously tested. The first one worked perfectly. I like this camera so much that I bought another as a backup. When I recently received the backup body, I tested the light meter and found that it worked, however I failed to fully test the camera and discovered, while away, that the focus was off. To focus a rangefinder, there are a series of small mirrors in the top of the body that interact with the lens to make two images that are placed in focus in the viewfinder by moving the focus dial on the lens. This was not working for some reason. The moral of that story is when travelling far from home with old film cameras, BRING TWO!
I switched to my old faithful and reliable Fujifilm mirrorless X-T1 with the 16mm-55mm zoom lens and used that for the first few days. The X-T1 performed perfectly and I managed to grab some really cool images in the gorgeous sunshine and landscapes of the south of France summer light. Strong contracting colours, epic landscapes, and beautiful textures of the ancient stones and buildings were a pleasure to shoot. Oh, the fields and fields sunflowers! If you are interested in checking out a few of these shots, go to my Facebook page here: https://www.facebook.com/jeremyhgreenbergphotography/photos/?tab=album&album_id=1667480096908390.
My preference is always to shoot with film, especially while travelling, and I had about 10 rolls of film waiting to be exposed to the beautiful scenes across the small towns across the Côte d’Azur or blue coast as they call it. After running around for a few days trying to find a film camera shop that might sell me a cheap alternative to my CLE to not avail, it dawned on me that I could still shoot with the RF even with the broken (out of alignment) focus issue. Zone focusing can be used especially on RF cameras whereas you set a focus range and simply eyeball or estimate the range of which the subject should be in focus or relatively so. Fortunately, the Leica 28mm lens that I brought for the CLE has the focus scale markings on it that align with the f-stop scale so that you can gauge zone or range of focus given the f-stop that you are using. More might equals a higher
f-stop (smaller aperture) and leads to a larger zone of focus. I though that I would give this a try.
Upon arriving home, I quickly developed my photos. The four colour rolls went to Dotwell for one hour processing and scanning and the following day, I developed the two and black and white rolls myself in the darkroom, made contact sheets, and printed a few 8x10. I was pleased to see my results. All but a few of the images were in focus or close enough that the images worked at least technically. I was very relived that I was able to accomplish my goal of making some memorable images of my holiday trip using the gorgeous wide-angle Leica glass and the colour film to capture the atmosphere of this magical place. The photo below was made with the Leica 28mm f/2.8 lens most likely at f/2 using Kodak Portra 400 35mm film at Le Commerce Restaurant in Mirepoix, France of some Baguette and house wine bottles.
Shifting back to digital, the X-T1 did well and I used it on and off throughout the trip. Interestingly, the Fujinon prime 23mm f/1.4 (35mm full frame equivalent) that I brought was never used. I got used to the moderately large and heavy zoom lens and really enjoyed the flexibility that it offered. Touring landscapes and castles requires a wide angle lens and it was nice to have the ability to take it all in using the lens at its widest focal length of 16mm (24mm equivalent on a full frame). Just as well, the ability to zoom to 55mm (85mm on a full frame) was equally as welcoming to get closer or to a subject that was farther away or to exclude (i.e. blur) the background thereby isolating the subject from the background. Although I never took the 23mm prime out of the bag, the Webelos Scout Master of my youth would be proud of my ability to Be Prepared. I am almost convinced that the relatively fast f/2.8 zoom lens is the only lens one needs for basic travel. For the photos that I was making of market wares, people, landscapes, and architecture this one zoom lens easily handled all of it and met my needs. There is a lot to be gained from accepting a strategy of less is more and travelling light with regards to photography gear. One might argue all day long that they need this lens, and that lens regardless of where they travel to, always, but at the end of the day, it’s more to lose, more to get stollen, and more liability to schlep more gear around the globe. With fewer camera bodies and lenses, the photographer has fewer gear choices and quickly learns the camera and lens combination that they have with them. This lack of decisions regarding gear leads to a focus on the only two decisions that really matter. Namely, the decisions boil down to where to stand, and when to press the shutter release button.
In conclusion, the south of France is outstanding in every way especially in the summer just steer clear of terroristic attacks. I missed the Nice attach by one day
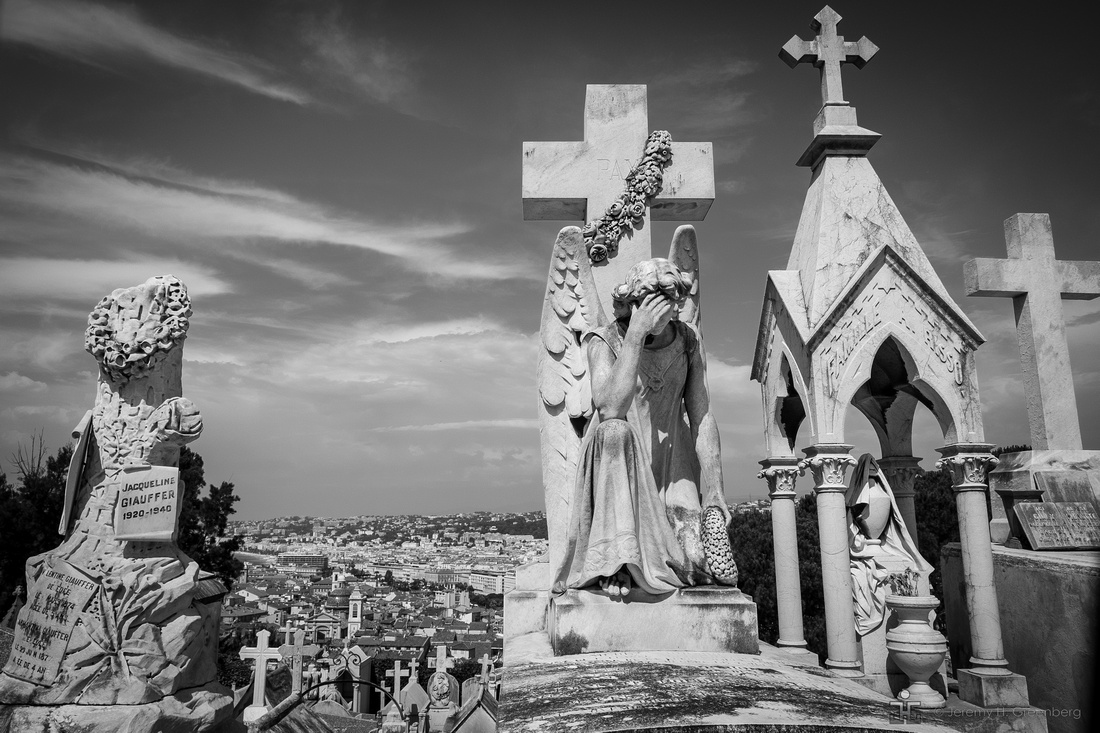
I'm still a bit freaked out by it. The other photo below was shot the day before in the Christian cemmetery above the beach area where the incident occurred.
Viva la France!
Happy travels to you and yours wherever you might be going this summer.
Remember, the light is always right.
jhg

Blog #27 If the suit maketh the man, the lens maketh the camera.
A camera can be simply defined as a light-proof box. The camera holds the medium in which the light will come into contact with become it becomes a photograph. Film of any size or an electronic sensor of any size, and sometimes photosensitive paper is loaded into the light-proof box such as when used in the pinhole camera http://www.kodak.com/ek/US/en/Pinhole_Camera.htm. The medium is exposed correctly using settings that are based on the exposure triangle that includes aperture, shutter speed, and ISO or the sensitivity of the medium being used. A lens is not required although the lens has been the subject and focus (pun intended) of many discussions about the quality and characteristics of a photograph. Lenses are generally made of one or more elements of glass that may be coated with various substances to prevent lens flare and improve clarity or other measurable dimensions of the lens. Lenses and materials have evolved and improved over the roughly one hundred-and-fifty-year history of photography although it’s mostly the technology used to create them where the real gains have been made. The aspherical lens, for example, contains multiple layers or elements that reduce or practically eliminate distortion and other unwanted side-effects of bending light through multiple layers of glass and directing it towards the medium that is required in the process of making images. There is a plethora of information available on the pros and cons of various types of lenses, materials, and physics involved in lens construction. Full frame versus crop sensors or other film sizes is another dimension of the discussion of lens that is worthy of mention. However, the technical aspects of lenses will be beyond the scope of this blog entry. Instead, here I offer an introduction to the camera lens, and present some various factors for the photographer to consider when selecting lenses for a various applications.
Focal length is essentially the size of a given lens as measured as the distance from the medium within the camera body to the front element of the lens. The general categories of lenses from smallest to largest with correlating sizes measured in millimetres are as follows: super wide angle, wide angle, standard, telephoto. A focal length of about 35mm or 28mm is considered a wide angle. Super wides are smaller such as 21mm, 18mm, or even 12mm sizes. A standard or prime lens is the 50mm and considered an “honest” lens due to the fact that humans see in the field of vision or angle of view of around 40 degrees that is normally represented by the 50mm lens. For more on the science and technical aspects of the physics of lenses, click here: https://en.wikipedia.org/wiki/Angle_of_view.
The 85mm lens is generally ideal for portraits in which the photographer seeks to separate the subject from the background. This focal length (as well as 50mm) can blur the background and create the generally pleasing effect of isolating the subject through this blur or bokeh https://en.wikipedia.org/wiki/Bokeh. The 50mm prime and longer telephoto lenses also function to compress the two dimensional image and flatten objects in the frame. In contrast, 35mm and especially wider angle lenses tend to distort the image making objects in the centre of the frame seem closer to the camera than they really are. Of course, there are compromises in lenses as in life. A wider angle of view gives you more of everything but that everything might be distorted. Telephoto lenses magnify and give you less angle of view but compress or flatten the image.
Of course, there are longer telephoto lenses that create larger magnification while reducing the angle of view. These can be anything from an 85mm, 120mm, 200mm, 300mm, 600mm, or even a 800mm. An 800mm lens is a whopper of lens that requires massive effort and heavy duty tripods to use correctly http://www.imaging-resource.com/news/2015/03/31/what-do-telephoto-lenses-really-do. 600mm is 60cm or about the length of an adult person’s arm so 800mm is massive! Telephoto lenses are used for wildlife or sports photography since it may be impossible or dangerous to be very close to the subject. There are specialty lenses as well such as macro, fisheye, or tilt shift lenses, that can be used for close-up photography, special effects, or architectural photography.
A camera is a light-proof box, but it is also a tool. The lens is a tool as well and one of the most important decisions that the photographer as technician or artist must make is which lens to use for which application or desired effect. Landscapes will require wide or super wide angles (such as the 28mm or smaller), while street, documentary, or portrait shooters generally require something in the 35mm-85mm focal length range. After experimentation for street or documentary photography, I have found that 28mm is to wide, 50mm is bit to narrow, and 35mm is just right. Although I oscillate between those three focal lengths for a majority of my work, most of my images are made at the 35mm focal length that is considered a wide angle lens. There is merit in getting familiar with one focal length as you develop the ability to quickly frame a scene a “see” the world in that focal length. I see in 35mm. It just feels right. Experiment and you will find what feels right to you.
Another decision that is required by the photographer is the number of lenses that they purchase and maintain in their arsenal. What lens comes along to a given event, or place? These decisions may be governed or influenced by needs, cost, or travel-related issues. Weather may influence the choice of lens as well since some modern lenses have a weather resistant rating that allows then to be used in virtually all conditions on land.
In addition to the focal lengths, there are prime or zoom lenses. A prime lens is one focal length such as the 50mm or “nifty fifty”, although there are other popular primes such as the 28mm, 35mm, and 85mm. Zoom lenses are adjustable to two or more focal lengths. A popular kit lens that may be purchased with most modern day DSLRs is the 28mm-85mm, for example. Zoom lenses are practice and useful since you effectively get three or four lenses in one. As terrific as this sounds, the disadvantage to these lenses are that they are not as fast as prime lenses. The speed of a lens refers to its maximum aperture. Zoom lenses have relatively fast aperture such as f/2.8. This may be good or good enough for many practical applications, but not great in low light conditions. In low light applications, a faster lens (one that has a bigger aperture or opening with a lower number) will perform better by opening wider and letting more light into the camera to come into contact with the medium (i.e. film or sensor). Prime lenses are simpler in construction, have fewer moving parts, and can therefore be made to have wider apertures. Aperture numbers and sizes such as f/1.8, f/1.4, or even f/1.2 are common on prime lenses. The rule is the smaller the number, the bigger the opening, and higher the price! Leica makes a prime 50mm f/.95 aperture lens that costs over $10,000 US that might be the widest aperture lens made https://en.leica-camera.com/Photography/Leica-M/M-Lenses/Noctilux-M-50mm-f-0.95-ASPH. Some would argue that there is no significant difference between an aperture of 1.4, 1.2, or .95. An aperture of f/1.2 is extremely low and fast enough for 99% of applications. If you are the type of photographer that needs to spend thousands to cover that last 1%, then more power to you! Stops of light are measured in thirds and lenses deliver what they are built to deliver, it’s as simple as that.
To review, basic decisions that the photographer must make regarding lenses are as follows: What subject or subjects will I be shooting? Will I need a longer or shorter lens other than my 50mm? How much money do I have to spend on lenses? Do I get one or more primes, or simply one zoom to cover many focal ranges? Will I need a lens that works in low light conditions? Where will I be travelling with my lens or lenses? Do I need enough lenses to cover the entire focal range such as 10mm to 1000mm or maybe 28mm-200mm will be suitable for the types of photography that I enjoy or plan to do? There are other considerations such as the use of camera systems. Many photographers have multiple brands of camera and most lenses will only work with cameras that match manufacturer. There are adapters for this lens and that body and the possibilities become extremely complex quickly http://www.popphoto.com/how-to/2013/02/lens-adapters-introductory-guide. Further complexity can be achieved when swapping lenses made for film cameras onto digital or modern camera bodies, or visa versa.
Most photographers would agree that the nifty fifty is an essential component of even the most basic of camera systems. If given the stuck on a deserted island scenario with one camera, and one lens, the nifty fifty would likely be a popular choice. As a prime lens, these are usually inexpensive, relatively fast, and a great all-around lens. Zoom lenses that cover the 28mm-85mm range are usually a good buy as well. If you can find one with an aperture number of f/2.8 and weather sealing (bonus), this would be a great lens to use when the shooting situation calls for various focal lengths, but carrying and/or changing lenses I not really an option under certain conditions.
Then comes the dilemma that all serious hobbyist and professional photographers face. If I have a zoom that goes from 28mm-85mm with f/2.8 do I get the 85mm prime portrait lens with f/1.2? Is the f/1.2 redundant and an unnecessary expense? At first, there seems to be little difference between these lenses or at least hardly enough to justify adding the 85mm prime to one’s collection when it comes with a price tag in the neighbourhood of $800 US dollars. Every photographer is different and has different needs. There is sometimes a big gap between want and need. Sometimes the gap is so small or imperceivable that want becomes need and G.A.S consumes even the most frugal of photographers http://jeremyhgreenberg.zenfolio.com/blog2015/7/blog-4. There are those of you out there of the die-hard I’m a one camera and lens photographer philosophy. I for one, am not that kind of photographer. I’m a strong believer in the right tool for the right job approach and for better or for worse, photographers are generally immune to buyers remorse. How many photographers have ever said “I really should not have bought this vintage Nikon DSLR”, or “I really wish that I didn’t buy this 28mm f/2.8 with aspherical elements that do not distort?”. It’s a healthy, albeit expensive, practice to experiment with different cameras, systems, and lenses, at least in the early part of one’s entry into the field of photography, even for amateurs, serious hobbyists, or professionals. Wait! I thought that it’s the photographer that makes the image, not the camera. While that statement is true enough, better tools make for better performance and effect confidence as well as image quality, some might argue.
Is that next lens really worth it? That depends. The answer is that if you want the best, then it probably is. If you are serious about making great images, then you will need to invest in the right tools for the right jobs. Camera bodies come and go and slight improvements are made from year to year. High quality glass, however, lasts for decades. Leica glass can be used reliably for one hundred years, by some estimates. The price is high, but the quality is outstanding. Old Nikon glass is also beautiful. Modern lenses are all really great for the most part. There has never been a better time to be an image maker. Keep your lenses. Save, but don’t compromise. As the old adage goes, If the suit maketh the man, the lens maketh the camera.
The light it always right!
jhg
Blog #26 Gear for Travelling (light is right)
Blog #26 Gear for Travelling (light is right)
Gone are the days of carefree travelling with massive luggage allowances. These days, the lighter the better and if you are anything like me when it comes to travel, minimalist is the name of the game. I’m not talking about one pair of underwear sort of minimalist but when it comes to gear and camera equipment, light is right. Sure, you could pack your clothing and stuff your smartphone in your front pocket and get out to the wilderness, and yes, you would have a very small and light travel camera. However, smartphones are good enough but not when it rains, and not in low light conditions. I have been caught in both of these scenarios enough times to want more out of my cameras and gear.
After many years of failed attempts to nail that perfect camera and bag combination, and getting it wrong, I think that I have finally found that ultimate travel photography set up. The Japanese have a business practice called Kaizen where they work towards constant improvement. I subscribe to this belief in my professional and person life as well https://en.wikipedia.org/wiki/Kaizen . The purpose of this blog is to share my little discovery in the area of travel photography with you. This blog entry will not discuss the What or When of travel photography (see Blog #24, http://www.zenfolio.com/jeremyhgreenberg/e/pages/blog.aspx#333462549 ) but will rather focus [pun intended] more on the gear.
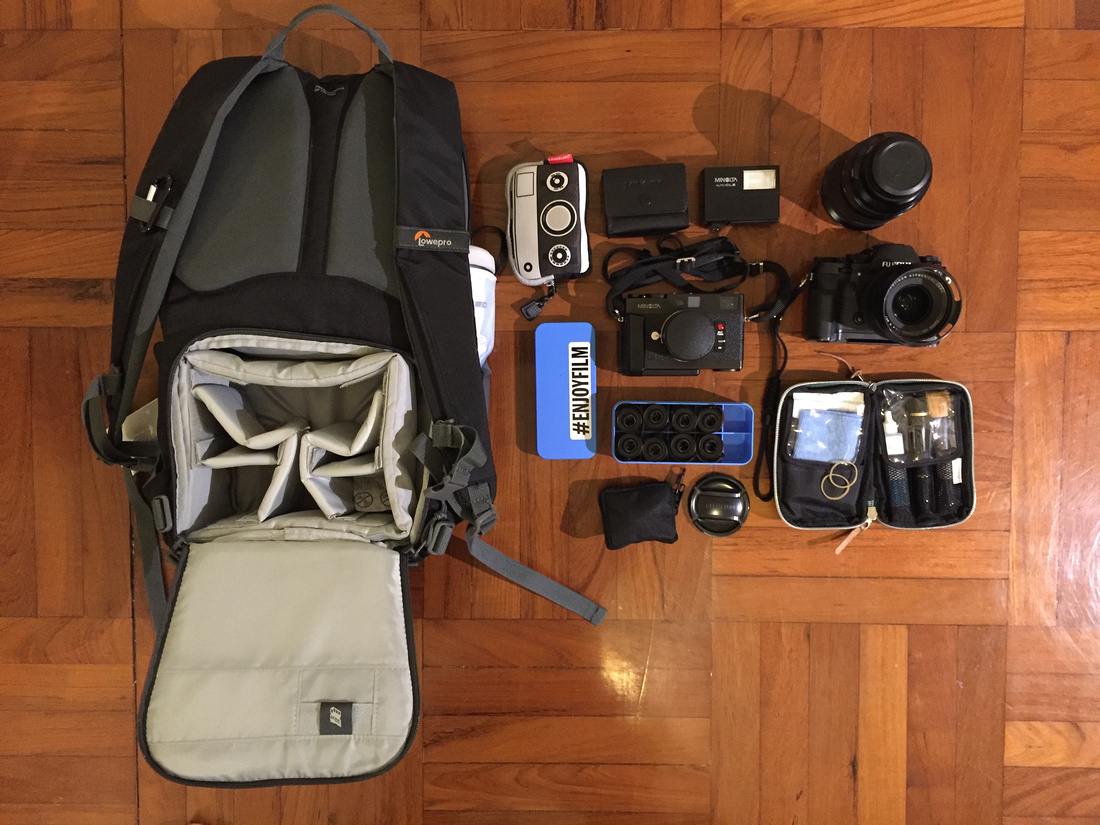
For me, analog film and digital is a way of life. It’s not an either or thing. I must travel with both. You might want to go with film or digital and that’s fine. Either way, I suggest two camera bodies and a maximum of three to four lenses are essential. Use both or use one as a backup in case one of them fails, more on that later. Let’s start with the bag. You want something fairly small and light that has rain protection. I have a whole closet full of bags and backpacks and my preferred bag is the Lowe Pro Photo Hatchback BP 150 AWII. It’s got the absolutely perfect amount of space that forces you to take only the essentials. Technically, it’s 7.7W x 4.3D x 5.9H in (19.5 x 11 x 15 cm) at 1.8 lbs. or 0.8 kg in weight. It’s a simple bag with large outside padded pocket that can easily fit an iPad Air (although I only travel with my iPhone 6 and extra battery charger). It has a top section for storage of a light jacket, small loose items, and the padded camera area that is accessible only by taking the bag off (see photo below). It is placed low to keep the weight towards the lower back, adding comfort. Side pouches on both sides can fit a small travel tripod (optional but not recommended) while also carrying a water bottle or two (highly recommended) in the opposite side so that the bag remains balanced. The Photo Hatchback also includes a removable waist belt and chest connection so each shoulder strap can be attached to each other preventing the shoulder straps from falling off of your shoulders while hiking, bending down to tie your shoes, or even running. There is a rain cover that discretely stows in the bottom of the bag when the sun is shining. Simple, functional, everything you need, and nothing you don’t.
In terms of my digital camera selection, the mirrorless FujiFilm X-T1 is outstanding. Its APS-C sensor size and weight are such that you forget that it's there white avoiding the feeling of carrying roughly the weight of a three-year-old hanging off of your neck for nine hours straight! Superb colour and image quality at 16MP is more that enough to appreciate images viewed on a 27" monitor or printed A3 size. The X-T1 is weather and temperature resistant with full functionality, video, and acceptable low light, high ISO quality that make this camera my number one choice. In fact, it is my only digital camera that I own. There is a high range of exceptionally good lenses for the X Mount Fujifilm system. Some of the Fujinon lenses water resistant as well. How water resistant? Very. I’ve shot in absolute pouring rain such that the camera was continuously 100% wet and it all just worked. Thank you Fujifilm! I travel with the 16-55mm (24mm-82.5mm full frame equivalent) f/2.8 weather resistant zoom lens and the prime 23mm (35mm full frame equivalent) f/1.4 for low light applications. The zoom might be enough be since it is slightly big and heavy, sometimes I just like my go-to focal length 35mm equivalent and let the good times roll. This covers the effective focal range of 24mm wide to 82.5mm portrait and gives enough reach to get me to the other side of street, so to speak, without crossing the road. Longer range lenses are bigger, heavier, and not optimal for travelling light. Plus, for street, documentary, night, portrait, landscape, or architectural photography (usually the stuff of travel), the bazooka lens is best left at home in its dry cabinet. Long lens are generally for sports or wildlife. If the travel that is planned may include one or both of these situations, of course the big guns must come out for those conditions. I rarely encounter these circumstances while travelling so I find that around 85mm is long enough.
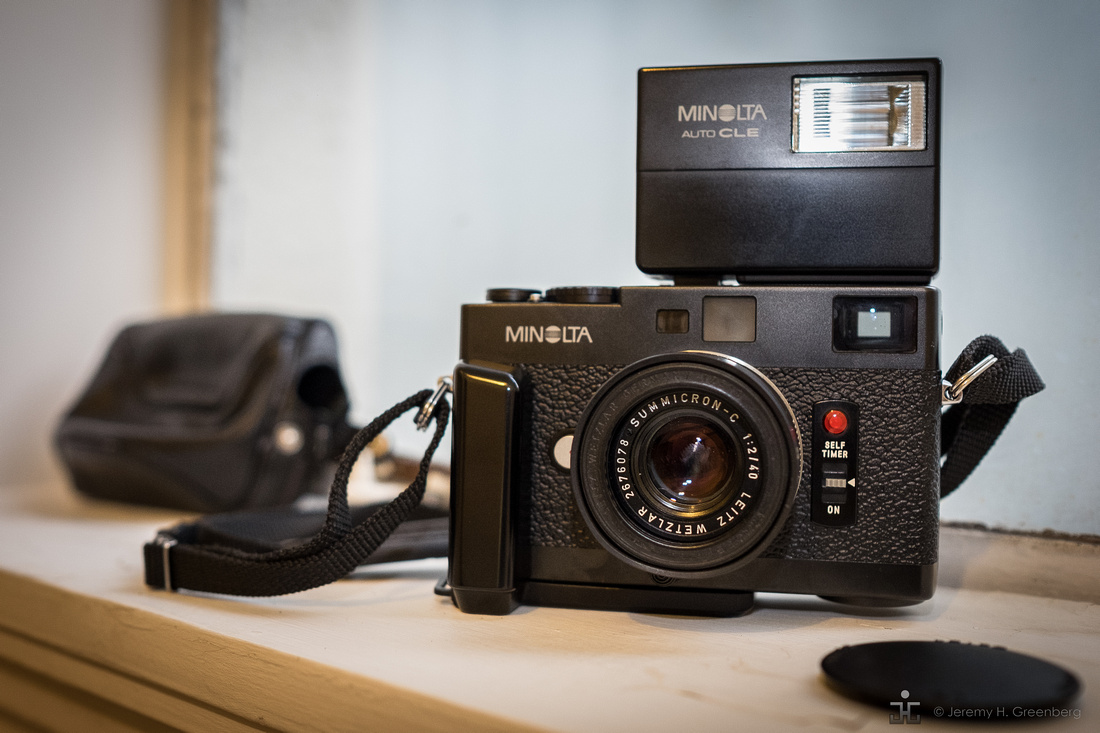
For film, in the early 1980’s there were compact 35mm film camera wars between American, European, and Japanese manufactures and more so across the various Japanese manufactures. Minolta of Japan around 1982 partnered with Leica of Germany and built one of the most incredible, small, light, and capable cameras ever made, the CLE (pictured below). It uses Leica’s M Mount system. The is a superb camera that has a mini sized flash and is so small a light that it really can only be beat by the Rollei 35. Other benefits to this rangefinder body style is that its light meter uses two small SR43 batteries that are inexpensive and readily available in most places plus they last for months or even years. The CLE has an aperture priority mode so that the only controls are aperture and focus, the camera does the rest. The CLE was designed to use the perfectly normal framed Leica Sumicron -C 40mm f/2. I would add the Leica 28mm f/2.8 Aspherical lens (German Edition) as a wide angle compliment. Both lens are tiny and quite possibly the best in their class in terms of image quality, size, and weight. Other than their bloody expensive price, these are heirloom quality lenses that most photographers would agree represent quite possibly the best optics available to the consumer or professional.
The flash that comes with the Fujifilm X-T1 is tiny and powered by the camera itself. The Minolta CLE rangefinder (pictured below) has a tiny but effective (up to about 15 feet or 5 meters) flash that takes two AAA 1.5V batteries. Extra batteries (and charger for the X-T1) are essentials with adapters for the given country or regions that I will be visiting. The blue box holds 10, 35mm cassettes (rolls) of film usually ample for one to two weeks of travelling. I usually bring about half and half colour and black and white. Black and white I can develop myself while the colour I will bring to the shop for processing when I return home. An x-ray proof film bag (not shown) is also used to protect the film from airport scanners http://www.bhphotovideo.com/c/product/185375-REG/Domke_711_15B_Film_Guard_Bag_Large.html. A small holder for extra SD cards is essential as well (not shown) for the X-T1. Pelican Cases makes a brilliant dust and moisture proof container for SD cards that I use http://www.pelican.com/us/en/product/watertight-protector-hard-cases/micro-case-series/memory-card-case/0915/. The only other gear related item is the lens cleaning kit (green) from Cura Japan. This contains a small high quality brush, lint free cleaning cloths and special alcohol-free liquid cleaner made for cameras and lenses. That's about it folks, two bodies, two lenses each. The whole kit fits inside this small sized bag and should not draw the type of attention that would entice even the most novice of would-be-thieves. Sans tripod sticking out of the bag like a COME STEAL ME neon sign, I should stay relatively safe. I also use a small combo lock on the outside zipper to avoid getting nicked while waiting in lines (I'm from New York, you can never be to careful). I also avoid camera straps with large colourful writing on them (Nikon, are you reading this?) for the same purpose of trying to keep on the DL (that's Down Low for you Millennials).
There should even be enough room for small compact umbrella (in the side much in lieu of tripod) and a light jacket or hat for cooler, rainy, or sunny weather. With one of the camera out and worn, the bag gets even lighter and can be used to store that bottle that I’m saving for after dinner…oh… I mean souvenirs.
Of course, the stuff that I listed is for recreational holidays and not necessary suitable for location based portraits or large scale commercial work. A tripod would be a must for such conditions. I plan to visit the south of France in the coming weeks and plan to bring exactly the aforementioned gear. Check here next month for a report on the optimal gear set-up for travel and some images from this experience.
May the light be with you, always.
jhg
Blog #25 Don’t Be Afraid of the Dark[room].
Blog #25 Don’t Be Afraid of the Dark[room].
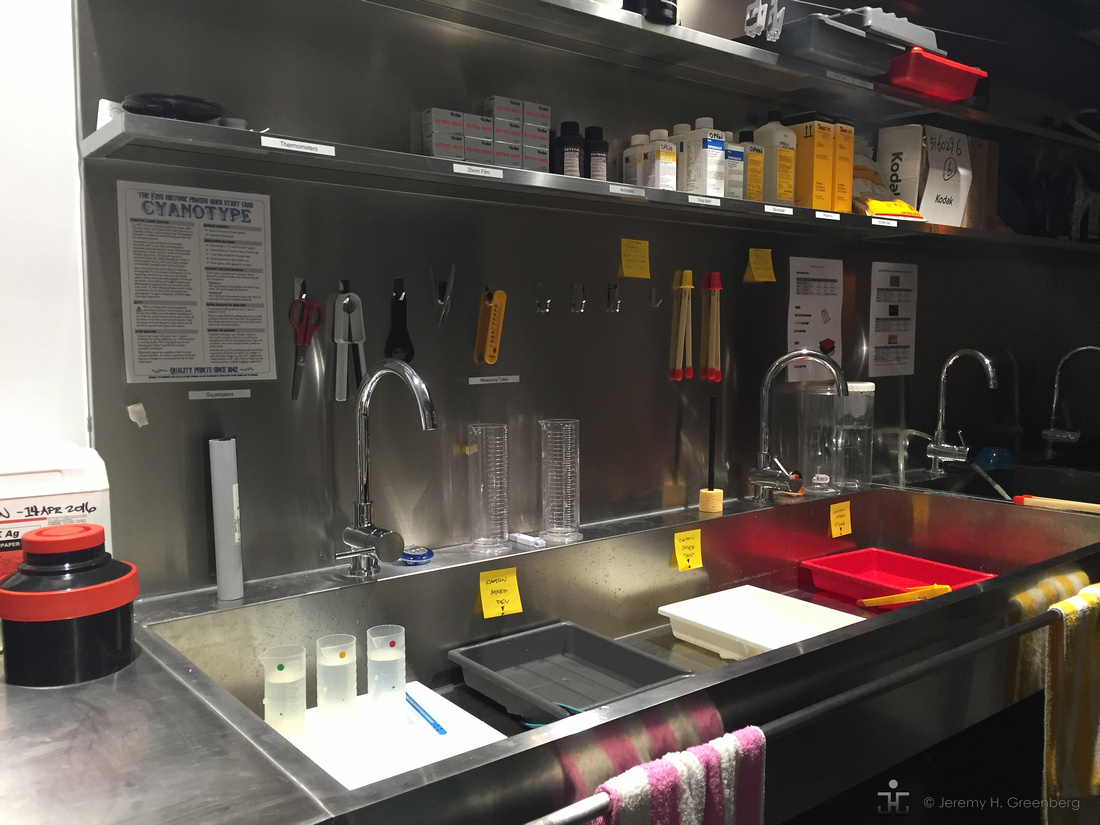
In previous blogs posts, I have discussed the Photography Club that colleague and photographer Brendan Fielding and I have been hosting for primary international school students at The Harbour School. We have finally completed the darkroom. We have successfully developed 35mm film, made contact sheets, and are now making prints.
Making prints will be the topic of this week’s blog. The steps to make a print are somewhat similar to processing film. Starting with a CLEAN negative, an enlarger, and photographic paper, step one is basically to make a test strip. The test strip provides information, given the settings on the enlarger (i.e. height, focus, f-stop, paper sensitivity, and time of exposure). Small sections of a strip of paper are exposed for equal intervals of time such as 2 second, 4 seconds, 6 seconds, and so forth. Then, changing nothing but time, you block off sections of the paper making a strip of paper exposed to 3, 4, or 5, (could be more) exposure times. The test strip gives you information about how long the proper exposure for a given negative, paper, and enlarger settings needs to be in order to make a print that is exposed properly. It doesn’t take long to make the test strip; less than five minutes usually.
Next comes the developing part that mirrors the processing of film. At this stage, you already prepared four trays in the appropriate size for your paper (i.e. 8”x10”, 11”x 17”). The first tray contains a dilution of paper developer and water, the second had the stop bath, the third has the fixer, and the fourth is a tray with only water for final rinsing. There are other steps such as anti-static agents and paper treatments, but these steps are not essential to make basic long-lasting paper prints. The paper is moved through the process and then placed on a drying rack to air dry, hung up, or otherwise placed in a flat drying machine until try.
There are basically two types of paper: fibre based and RC or plastic (resin) coated paper. In general, fibre is more expensive and may make better prints, while the RC stuff is more durable and just fine for regular usage while being less expensive and tries flatter and is less subject to curling. Within these two paper types, there are various finishes or sheens such as high gloss, glossy, semi-matte, matte, pearl and some other similar variations or tones of white such as bright white, to yellowish or warmer tones. This is really a matter of personal taste and depends on the preference of the artist/photographer.
Unlike developing film which usually takes about 20-30 minutes from start to finish, paper is much faster. Paper gets exposed to light for around 3-10 seconds, developing takes 120 seconds, stopped for 20 seconds, fixed for 2-5 minutes (depending on the type of paper), and then placed in the final rinse for up to about 10 minutes. The cleaner or chemical free the paper is, the longer it will last. Then the paper is dried and the print is ready to be handled, scanned, or framed.
The process is fairly straight forward, albeit complex with much room for error. A proper understanding of the settings of the enlarger is required. The photographer must read the manual or risk making prints that simply do not come out right. When developed correctly, the resolution of photographic paper is the best that there is and the process is highly rewarding. There is a quiet calm, and zen like feeling in the darkroom when one goes through the motions and gets in a rhythm. Every photographer be they hobbyist, amateur, or professional should have this experience. It’s fun!
Don’t be afraid of the dark[room].
jhg